FullCalendar-日程表vue使用
Fullcalendar是一个非常受欢迎的日历日程处理的js组件,它功能强大,文档齐全,可定制化高,可与你的项目无缝对接。本站之前有很多文章介绍了Fullcalendar(v5)的使用。今天我们来看看如何在Vue框架下使用Fullcalendar。
- FullCalendar官网:fullcalendar.io/
- FullCalendar官方文档:fullcalendar.io/docs
最新FullCalendar中文文档合集 大家可以参考这个网站的总结,挺到位 最新FullCalendar中文文档
先看效果图
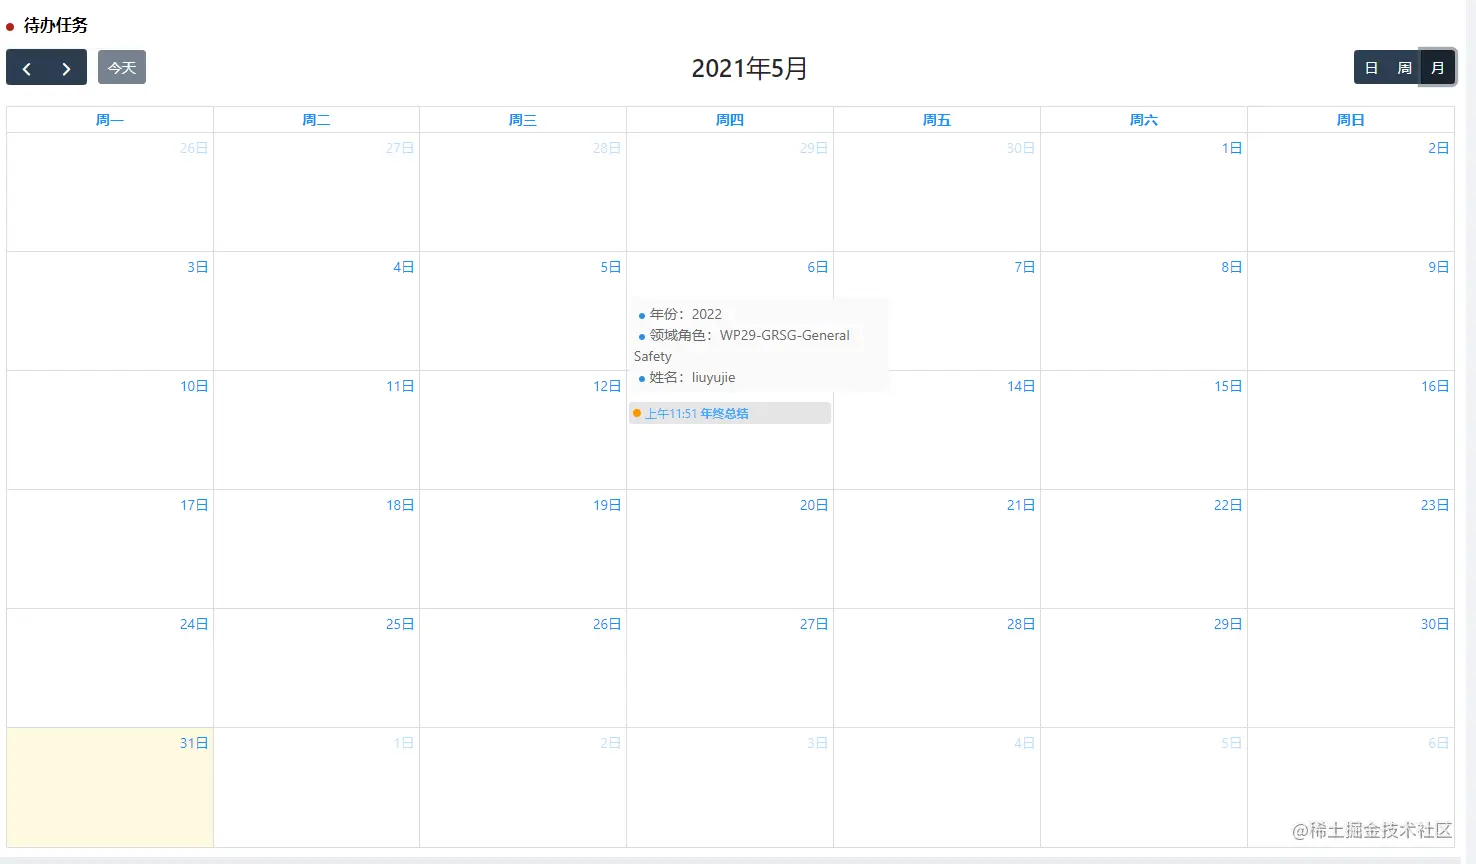
安装Fullcalendar
npm install --save @fullcalendar/vue @fullcalendar/core @fullcalendar/daygrid @fullcalendar/interaction @fullcalendar/timegrid
FullCalendar 以核心代码和插件形式提供给用户安装,因此我们需要哪些功能,就直接安装对应的插件即可。使用时可以参照:功能插件列表。
使用
1. 建立一个Fullcalendar.vue
<template>

  <div class="top" style="background: #fff; padding: 8px 6px">
    <div class="modelBox">
      <span class="radis"></span>
      <span style="color: black; font-size: 16px; font-weight: bold">待办任务</span>
    </div>
    <div class="tabs" style="width: 100%">
      <FullCalendar ref="fullCalendar" :options="calendarOptions" class="demo-app-calendar" />
    </div>
  </div>
</template>
2. 引入所要用的插件
import FullCalendar from '@fullcalendar/vue'
import dayGridPlugin from '@fullcalendar/daygrid'
import timeGridPlugin from '@fullcalendar/timegrid'
import interactionPlugin from '@fullcalendar/interaction'
import zhCnLocale from '@fullcalendar/core/locales/zh-cn'
3. 所有的配置项在calendarOptions完成
calendarOptions: {
        plugins: [

          dayGridPlugin,
          timeGridPlugin,
          interactionPlugin,
        ],
        height: 800,
        width: 600,
        headerToolbar: {

          left: 'prev,next today',
          center: 'title',
          right: 'timeGridDay,timeGridWeek,dayGridMonth',

        },
        handleWindowResize: true,
        initialView: 'dayGridMonth',


        selectable: true,

        dayMaxEvents: true,


        eventMouseEnter: this.handleEventMouseEnter,


        eventClick: this.handleEventClick,
        locale: zhCnLocale,
        nextDayThreshold: '01:00:00',
        events: [


        ],


        eventAdd:
        eventChange:
        eventRemove:
        */
},
4. 日程表赋值
that.calendarOptions.events.push({
   color: '#ff9900',
   title: element.name,
   date: element.time,
   status: this.statusName,
   type: element.type,
   times: element.time,
   category: element.category
})
5. 本案例用到在日程上鼠标移入悬浮框显示详情,利用eventMouseEnter鼠标悬停事件,这里用到tippy.js插件,tippy.js文档。
handleEventMouseEnter(info) {
      console.log(info, 'yyyy')
      let col = info.event.borderColor
      let eve = info.event._def.extendedProps
      let category = info.event._def.extendedProps.category

      tippy(info.el, {


        content: `<div style='width: 260px;background-color:#FAFAFA;padding:5px;font-size:14px;z-index:99999;'>
                  <div style='display:flex;color: #666666;overflow: hidden;' class="${ eve.category == 1 ? 'hidden' : ''}">
                    <div><span style='display:inline-block;width:6px;height:6px;background-color:#318DDE;border-radius:50%;margin:0 5px;'></span>会议名称: </div>
                    <div style="width:161px;white-space:normal;overflow: auto;table-layout:fixed; word-break: break-all; height:auto;display:inner-block">${info.event.title}</div>
                  </div>
                  <div style='color: #666666;overflow: hidden;' class="${ eve.category == 1 ? 'hidden' : ''}"><span style='display:inline-block;width:6px;height:6px;background-color:#318DDE;border-radius:50%;margin:0 5px;'></span>会议类型:${eve.type}</div>
                  <div style='color: #666666;overflow: hidden;' class="${ eve.category == 1 ? 'hidden' : ''}"><span style='display:inline-block;width:6px;height:6px;background-color:#318DDE;border-radius:50%;margin:0 5px;'></span>会议时间:${eve.times}</div>
                  <div style='color: #666666;overflow: hidden;' class="${ eve.category == 1 ? 'hidden' : ''}"><span style='display:inline-block;width:6px;height:6px;background-color:#318DDE;border-radius:50%;margin:0 5px;'></span>会议状态:${eve.status}</div>
                  <div style='color: #666666;overflow: hidden;' class="${ eve.category == 0 ? 'hidden' : ''}"><span style='display:inline-block;width:6px;height:6px;background-color:#318DDE;border-radius:50%;margin:0 5px;'></span>年份:${eve.year}</div>
                  <div style='color: #666666;overflow: hidden;' class="${ eve.category == 0 ? 'hidden' : ''}"><span style='display:inline-block;width:6px;height:6px;background-color:#318DDE;border-radius:50%;margin:0 5px;'></span>领域角色:${eve.depRoleName}</div>
                  <div style='color: #666666;overflow: hidden;' class="${ eve.category == 0 ? 'hidden' : ''}"><span style='display:inline-block;width:6px;height:6px;background-color:#318DDE;border-radius:50%;margin:0 5px;'></span>姓名:${eve.name}</div>
                </div>`,
        theme: 'light',

        interactive: true,
        placement: 'top-start',
        allowHTML: true,
        zIndex: 99999,
      })
    },
许可协议:
CC BY 4.0